Sunday, January 30, 2011

10 Tips on How to Take Great Pictures

This week, I learned that there is more to just snapping a picture and hoping it comes out okay.  After reading "Top 10 Tips to Taking Great Pictures", I did not have any recent food pictures to share with you so I had fun looking through my old honeymoon pictures.  Here are Kodak's 10 tips:

1.  Get down on their level. If you are taking a picture of a dog, kneel down and take the picture. For this example, I used my dog, Coco.  

Not a good example.  This picture is of Coco as I was looking down at him while he was begging for food.

Isn't Coco quite the model?


2.  Use plain background. Before you take a picture, check the area around and make sure it is not too cluttered. It is also important to make sure nothing is sticking out of someone's head.

The bird just blends in the background.
This would have been a good picture if I noticed the tree coming out of my son's head.
3.  Use Flash outdoors.  I had no idea!  Using Flash outdoors lightens dark shadows under the eyes and nose in bright overhead sunlight and brightens up faces on cloudy days and helps them stand out from the background.

4.  Move in close to what you are taking a picture of to eliminate background distractions.

Hmm...Decisions, decisions!
Flower in the Rainforest

5.  Take some vertical pictures.


6.  Lock the focus to create a sharp picture of something that is off center.

Arenal Volcano


7.  Move in from the middle.  In photography, there is something know as the Rule of Thirds which means to imagine a tic-tac-toe grid in your camera’s viewfinder.  By placing what you want to take a picture of at one of those intersections off center, you create a balanced photo that can be naturally viewed by our eyes.  The Digital Photography School blog has some good examples of Rule of Thirds.  


West Coast of Costa Rica

8.  Know your Flash’s range. Pictures taken beyond the maximum Flash range, which is ten feet (about four steps away) for most cameras, will be too dark. 


9.  Watch the light. Great light = Great pictures. If you are taking pictures of people, choose the soft lighting of a cloudy day and avoid overhead sunlight because it casts unwanted shadows across the face.  Early or late daylight is the best for scenic pictures. The best example I can find was a picture I took of the Hot Springs at the Tabacon Resort in Costa Rica.


Hot Springs at the Tabacon
10.  Be a picture Director by adding props, rearranging things, and try different viewpoints.

The Big Game is next weekend!  Who are you rooting for?  Vote below!  I would also love to hear what your favorite Super Bowl dishes are.  Crispy Barbeque Chicken Wings are definitely on the menu for next week!  Come on back to find out what else!   

Friday, January 28, 2011

7-Layer Mexican Dip, Guacamole and Chili Recipe

I can hardly believe it is Friday already! This week flew by for me.  On the home front, my husband and I finally finished putting the rest of the foam letters in our son’s playroom.  They are awesome! They have extra cushion which is perfect because my little guy can practice walking and we don’t have to worry about him falling and hurting himself on the tile floors. I also have to admit that it is nice to have a safe area for him to play and entertain himself while I cook.
I made two yummy dishes that took me back to my childhood.  My mom’s hearty Stuffed Peppers jumped to mind when the temperature dropped below 60 degrees and I was forced to turn on the heat!  Still not as cold as the rest of the country who are covered in snow but cold enough for me to crave something warm like mom's Stuffed Peppers and tomato soup .  I also made one of my favorite Polish dinners - breaded pork chops, mashed potatoes, and a dill cucumber salad.  I promise to give you the recipes for these in the near future.  
Without further adieu, it is time to share the 7-Layer Mexican Dip recipe. A couple years back, my sister-in-law brought over this dynamite dip and within seconds, it was devoured! The chili was made mostly according to McCormick’s Original Chili packet recipe and the guacamole is a Tyler Florence recipe that I saw on the Food Network some time ago.  The rest of the layers are simple ingredients.
Let’s start with the super easy Chili recipe. I have to admit; I do tend to take some shortcuts like this chili packet recipe but why mess with a good thing?  

Turkey Chili


You will need:
  • McCormick’s Original Chili Seasoning Mix
  • 1 lb. of Ground Turkey or Ground Beef
  • 1 jar of your favorite salsa (I like Newman’s Own Mild Salsa)
  • 1 can of red kidney beans
  • 1/2 cup - 1 cup of water
  • Large skillet with a cover
Directions:
  • Brown the meat in a large skillet on a medium-high heat.  
  • Drain the fat.  
  • Stir in the Chili seasoning mix, salsa, beans and about half a cup of water (more or less) to dissolve the seasoning.  Be careful not to make the chili too watery. You just want to pour in enough water to dissolve the seasoning in the skillet. 


  • Bring to a boil and cover.  Then, reduce heat to low and simmer for 10 minutes, stirring occasionally. That's it! You've got Chili!

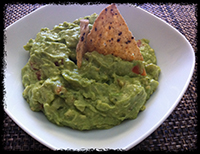
Now, Tyler Florence’s Guacamole.  He has two recipes - one that uses cumin and chili powder and another that uses serrano chiles.  I am going to make the recipe that uses serrano chiles. If you would like to follow along step-by-step, check out this video!


Chunky Guacamole


You will need:
  • 4 ripe avocados
  • 3 limes, juiced
  • 1/2 of a red onion, minced
  • 1 garlic clove, minced
  • 2 serrano chiles, sliced thinly (I substituted tomatoes for the chiles but if you like the heat, go ahead and use the chiles.)
  • 1 big handful of fresh cilantro, finely chopped
  • A little extra-virgin olive oil to add that nice shine
  • Kosher salt and freshly ground black pepper
Directions:
  • Halve the avocado by slicing into the avocado until you feel the pit then carefully turn the avocado around the pit. You then twist open the avocado. Next, you again carefully, hit the knife blade into the pit and twist the knife.  The pit will come right out of the avocado. 
  • Scoop out the flesh with a tablespoon into a mixing bowl. 
  • Mash the avocados with a fork, leaving them somewhat chunky.  
  • Add the remaining ingredients and squeeze half a lime*.  Fold everything together to gently mix. Add more lime, salt and pepper to your individual taste. 
  • Lay a piece of plastic wrap right on the surface of the guacamole so it doesn't brown and refrigerate 1 hour before serving.

*The original recipe states to use 3 juiced limes but the lime flavor was extremely overpowering the first time I made the recipe.  I would start with half a lime and add more as you go along according to your taste preference.

Now, we are ready for the 7-Layer Mexican Dip.


7 Layer Mexican Dip


You will need:
  • Clear glass pan
  • 1 can of refried beans
  • 1/2 lb. of Chili
  • 2 cups of Guacamole
  • 1 (8 oz.) Container of Sour Cream
  • 1 lb. of shredded Cheddar Cheese
  • Tomato, diced
  • Lettuce, shredded
  • 1 Bag of Tortilla Chips
Healthy Substitutions:
  • Fat-free refried beans 
  • 2% cheddar cheese 
  • Light sour cream
Directions:
  • Spread refried beans in the bottom of the pan.


  • Spread the guacamole, then the chili.


  • Now, spread the sour cream.  Don’t worry about being perfect.  The easiest way to spread the sour cream is to add three big individual spoonfuls then gently spread it.  


  • Sprinkle cheese, then the lettuce, lastly add the tomatoes. 


  • Serve with tortilla chips. 


This last bonus recipe was an accident but what a delicious mistake! A couple months ago, my sister-in-law along with her brother and two cousins came for a visit.  My sister-in-law and I were busy in the kitchen making the dip when her cousin ran into the kitchen starving so I suggested a grilled cheese.  The only bread I had at the time was Arnold’s Multigrain Sandwich Flats.  Alyssa grabbed the bread, cheese and then decided to scoop the chili in between the cheese.  At that very moment, “The Alyssa” was born!


"The Alyssa” Chili Grilled Cheese


You will need the following for 1 serving:
  • Arnold’s Multigrain Sandwich Flat
  • 2 slices of American Cheese
  • Butter or butter substitute
  • About 2 tablespoons of chili
  • Small frying pan
  • Lots of napkins
Directions:
  • Heat the small frying pan on medium heat. 
  • Butter both sides of the sandwich flat. 


  • Top the unbuttered side with one slice of cheese, chili, another slice of cheese and the other unbuttered side of the bread.


  • Flip the sandwich over when cheese slice closest to the bottom starts to melt. 


  • When the cheese begins to ooze, plate and enjoy.  Have those napkins handy!


Sunday, January 23, 2011

Food Pictures Taken This Week

Happy Football Sunday to all the football fans out there! In the next couple weeks leading up to the Super Bowl, the theme of my cooking blog will be about the big day so I will be making delicious recipes I am going to share with you along with recipes from famous chefs that I will review. One of the recipes has to be some finger-licking chicken wings. I consider myself a good cook but for some reason, chicken wings pose a challenge for me. I once under-cooked them and have been a bit apprehensive about giving them another chance but I am sure one of my favorite chefs can help me. 


This week, my goal was to practice taking pictures of everything I cooked and I learned a lesson worth sharing. It is not nice to put out a plate full of warm caramel walnut brownies and make your house guest stand around as you try to capture the best picture. I can not take credit for the brownies because I made box brownies but not just any box, I made Ghiradhelli’s Caramel Turtle brownies. If you have not tried them, I highly recommend you do. Actually, I will let the below picture speak for itself!


Speaking of pictures, I would love to hear your feedback on what you think of the following three photos, as well as the above brownie picture.  I am also very open to any advice you would be kind enough to share on how to improve my shots.  This picture is of my half-eaten (couldn't help myself) sandwich I made the other day.


This is a simple chili I made using a packet recipe but I substituted ground turkey for ground beef since turkey is leaner and there isn't much of a taste difference, in my opinion.


This last picture is of guacamole I made using Tyler Florence's recipe omitting chili powder and cumin because I did not have any available.  It came out great!


Next week, I will be combining the chili and guacamole recipes to make a 7-Layer Mexican Dip, as well as, a wonderfully messy,  cheesy chili grilled cheese recipe called "The Alyssa"!

Friday, January 21, 2011

Cooking My Way Through Life

As a new mom, I find myself wishing for more hours in the day. My little guy is quite the active one and craves my undivided attention. I remember not too long ago envying women that stayed home with their children and not realizing what it really meant to be at home full-time with a baby. Please do not get me wrong, I know how fortunate I am to be at home with my child but at the end of the day, I am drained especially by the time dinner rolls around. I try to get to the grocery store over the weekend and plan meals for the week but most of the plans I come up with are of the same old dishes I have made over and over again. What tends to happen is the weekly grocery store visit doesn’t happen which then leaves me with two choices – to either order in or scour the pantry for a quick and edible concoction. Good thing my hubby is pretty easy-going and doesn’t mind the occasional frozen pizza or whatever else I come up with. With that said, this is where an idea for my blog comes into play.

I have always wanted to start a cooking blog but just did not know where to start until now. Thanks to my Social Media Marketing class assignment! Starting a cooking blog is not as easy as it sounds. Sure, I recreate a bunch of recipes and then let you know if I liked them but photography is another important element of a successful cooking blog. A well-taken picture of a “right-out-of-the-oven” chocolate chip cookie or lasagna oozing with gooey cheese should thrill your taste buds and make your mouth salivate. So, along with recreating and reviewing my favorite chef and family recipes, I will also learn how to take great photos and pass my knowledge down to you, as well as, some cooking tips I learn along the way.