Sunday, April 24, 2011

Loaded Vegetable Egg White Frittata

With Easter being about eggs, naturally, I thought to share an egg recipe this week. I have to credit my sister-in-law, Michelle, for the following Frittata recipe.  A few years ago during an annual family Myrtle Beach trip, we were all pretty much dieting so Michelle made a simple, healthy and delicious Spinach and Egg White Frittata. 

Throughout the years, I continued using egg whites but would sauté various vegetables and even toss in bacon or Canadian ham. Being that I was trying not to eat meat until Easter, I replaced the meat with Portabella mushrooms and loaded the Frittata with sautéed and steamed vegetables as well as lots of cheese. You can follow my recipe or get creative and add whatever you wish!  I mentioned using a microwave steam bag for the broccoli and cauliflower but you can steam the vegetables your way.

Loaded Vegetable Egg White Frittata


What you will need:
  • 1 cup of broccoli florets
  • 1 cup of cauliflower florets
  • 1 bag of Baby Spinach
  • 2 cups of either shredded cheddar cheese or 6-8 slices of American cheese, diced into small pieces
  • 8 oz. carton of Portabella mushrooms, chopped
  • 1/3 cup of onion, chopped
  • Tomato, chopped
  • 1 tablespoon of Extra Virgin Olive Oil
  • 1 tablespoon of butter
  • 32 oz. carton of Liquid Egg Whites 
Hardware:
  • Ziplock Zip N Steam Bag
  • Frying Pan
  • Square glass baking pan
  • Non-stick cooking spray

Directions:

  • Preheat oven to 350 degrees.
  • Heat up butter and the olive oil in a large frying pan on medium high heat.
  • Chop the mushrooms, onion, and tomato.

  • Sauté the mushrooms in the frying pan for 3-4 minutes. Stir occasionally.
  • Add the chopped onions and sauté for another 3 minutes. Also, stir occasionally. 
  • Add the chopped tomatoes and again, sauté for 3 minutes.
  • Lastly, add the baby spinach and sauté for another 3 minutes. Stir occasionally and season with salt and pepper. Remove from heat and set aside.

  • Rinse and chop the broccoli and cauliflower into florets, if they did not come that way already.
  • Place the broccoli and cauliflower florets into the steam bag and microwave for 3 minutes.
  • If you are using American cheese, cup up 6-8 slices into small pieces.
  • Spray the baking pan with non-stick cooking spray.
  • Spread the steamed broccoli and cauliflower florets along the bottom of the baking pan.
  • Sprinkle one cup of cheese over the florets and add the spinach, mushroom, onion, and tomato mixture on top.  Give everything a quick toss and sprinkle the rest of the cheese over the top.

  • Pour in the 1 ½ cups of liquid egg whites and bake for 15-30 minutes, depending on your oven.  If you have a strong oven, check the frittata after 10 minutes.  My frittata took almost a half hour! You’ll know it is ready when the egg whites are solid.


Happy Easter!

Saturday, April 16, 2011

Spinach, Mushroom & Italian Three Cheese Stuffed Manicotti

I’m “stuffed” after last night’s dinner! On the menu this week: Spinach & Mushroom Manicotti.  I had fresh mozzarella to use up and thought Manicotti was a nice change from the usual Stuffed Shells I make.  For the manicotti filling, I sauteed mushrooms, onions, garlic, threw in baby spinach and later combined everything with ricotta, mozzarella, parmesan and basil.  The end result was delish! My 100% Italian dinner guest agreed, which was the ultimate compliment!


Spinach, Mushroom & Three Cheese Stuffed Manicotti


What you will need for about 6-8 servings:
  • 8 oz. box of Manicotti pasta shells
  • 1 tablespoon of sea salt for the pasta water
  • About 4 quarts of water
  • 2 Tbsp. of Extra Virgin Olive Oil 
  • 8 oz. package of button mushrooms, chopped
  • 1 garlic clove, minced
  • 1/4 cup of onions, finely chopped
  • 1 bag of fresh baby spinach
  • Salt & Pepper to season
  • 2 eggs
  • 2 lb. container of Ricotta cheese
  • 1/3 cup fresh basil, chopped 
  • 2 cups of shredded Mozzarella cheese (one for filling and another for sauce at the end)
  • 3/4 cup of grated Parmesan cheese (1/2 cup for the filling and 1/4 cup for the sauce at the end)
  • 1/2 teaspoon of Vegeta or 1/2 teaspoon of sea salt for cheese mixture
  • 2 lb. jar of Prego Traditional Italian Sauce or any other sauce you like
Hardware: 
  • Large pot
  • Large frying pan
  • Aluminum foil
  • Baking dish
  • Whisk or fork to beat eggs
  • Teaspoon, small baby spoon, or plastic ziplock bag* 
  • Wax paper, optional
  • Tongs, optional but helpful
  • Loaf of Italian or French bread, optional
*Before you get started, I wanted to share a helpful tip.  To make stuffing the manicotti easier on you, fill a plastic ziplock bag, cut off one of the corners and squeeze the filling into the manicotti shell.  This should be a lot easier and less messier than stuffing it with a teaspoon like I did. The directions below reflect how I stuffed them originally so if you end up using the plastic bag trick, let me know how it worked out for you.


 Directions:
  • Preheat oven to 350 degrees.
  • Spread 2 cups of sauce along the bottom of the baking pan and set aside.
  • Fill a large pot with water (about 4 quarts) according to the pasta box directions and bring to a boil.  In the meantime, prepare the mushroom and spinach.
  • Cook the pasta until it is al dente, drain, and rinse with cool water.
  • Spread a sheet of either wax paper or aluminum foil down and lay the manicotti on it side-by-side.
Prepare the mushroom and spinach:

  • Heat up the olive oil in a large frying pan on medium heat.
  • Finely chop 1/4 cup of an onion and mince a clove of garlic.  To remove the garlic peel, place the clove on a flat surface and smash it to break apart the skin. Use the flat side of a wide knife, flat side of a meat tenderizer, or a small pot, as in my case. 
  • To clean the mushrooms, wipe them down with a damp cloth and chop them up.
  • Add the mushrooms, onions, and garlic to the heated frying pan.  Sauté and stir occasionally until the mushrooms have turned a darker color and the onions are translucent, about 5 minutes. 

  • Add the bag of spinach and sauté for another 5 minutes, stirring occasionally.  Season with salt and pepper. Remove from heat and allow to cool.


Preparing the cheese filling:

  • Chop about 6 large basil leaves which should produce 1/3 cup.
  • In a large mixing bowl, slightly beat the eggs with a fork or whisk to combine them.
  • Add the ricotta, one cup of mozzarella, half a cup of parmesan, chopped basil, half a teaspoon of Vegeta or salt, and stir to combine.
  • Now, stir in the cooled spinach and mushroom mixture.


Stuffing the Manicotti:
  • With a small spoon, gently stuff the filling into each manicotti shell being careful not to rip it. If it rips a little, don’t beat yourself up. It happens!
  • Line all the stuffed manicotti down on the bottom of the sauced baking pan.
  • Cover the shells with about 2 cups of sauce and spread mozzarella over the sauce.  
  • Sprinkle about 1/4 of a cup of parmesan over the mozzarella.
  • Cover the pan with aluminum foil and bake for 30 minutes.
  • After 30 minutes, uncover the pan and bake for an additional 10 minutes or so to melt the cheese. 
  • Cool for a couple minutes before serving so the cheese filling sets.
  • Serve with garlic bread and enjoy!

Roasted Garlic Bread 


What you will need:

  • Loaf of Italian or French bread
  • Extra Virgin Olive Oil, spreadable butter or butter substitute
  • Garlic bulb, roasted
  • Chopped basil, optional
  • Salt and pepper for seasoning
Hardware:
  • Baking sheet
  • Aluminum foil
Directions:
  • Preheat oven to 425 degrees.
  • Peel away the outer layers of the garlic and cut a half inch off the pointed end of the garlic bulb.
  • Place the garlic bulb on the baking sheet with the cut tops facing up and drizzle oil over the cloves.  
  • Cover with a piece of aluminum foil to prevent the garlic from burning and roast for 10-12 minutes or until the garlic is soft. Allow to cool before handling.
  • Reduce the oven temperature to 350 degrees.
  • Cut the loaf of bread down the middle and spread butter or oil over the top.
  • Squeeze the roasted garlic and spread it on top of the bread. 
  • Season with salt and pepper and put the bread in the oven for about 5 minutes.  You just want to slightly crisp the outside of the bread, leaving the inside soft.
  • Remove from oven, spread chopped basil over the top (optional) and cut into 2-3 inch pieces lengthwise.  

Next week, I will be coloring Easter eggs and preparing my son’s first traditional Polish Easter basket for a Sunday breakfast feast! 

Saturday, April 9, 2011

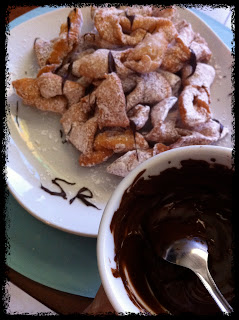
Chrusciki - Bite into these heavenly Polish Angel Wing Cookies!

I spent a couple weeks in New York and New Jersey for my good friend’s bridal shower and bachelorette party.  The week started out with yet another first birthday party for my son (lucky little guy!) thrown by his nana and ended with my mom teaching me how to make Golabki (Stuffed Cabbage) and Pączki (Polish Donuts). Keep an eye out for those recipes!
When my trip “up north” (as I refer to it) came to an end, saying goodbye to family and friends was tough.  The only light at the end of the tunnel was that my mom was able to fly back home with me and my son and spent a couple days with us.  I was sad to see her go home yesterday but the memory of all the good times make it a little less depressing.  
Cooking and baking with my mamuska (meaning “mom” in Polish) is such a special experience to me.  We make such a great team! We made Chrusciki, which are Polish Angel Wing cookies, yesterday.  If you enjoy a cookie that is light and flaky and not awfully sweet, these heavenly cookies are for you!
Chrusciki (Polish Angel Wing Cookies)


What you will need to make 2 dozen cookies:
*Double the recipe if you need more cookies
  • 1 egg at room temperature
  • 2 egg yolks at room temperature
  • 1/8 teaspoon of butter
  • 1/4 teaspoon of salt
  • 1/4 teaspoon of almond extract
  • 1/4 cup of powdered sugar
  • 1/2 shot of vodka, rum, brandy or whisky of your choice
  • 1 cup of flour
  • 1 pound can of vegetable shortening or canola oil
  • Flour for rolling dough out
  • Powered sugar for dusting cookies
  • 1/2 cup of chocolate chips for drizzling on top of the cookies (optional)
Hardware:
  • Large mixing bowl
  • 2 small bowls for separating egg yolks
  • Hand mixer or stand mixer with whisk and dough hook attachment (Okay to use your hands, as well)
  • Rolling pin
  • Sharp knife
  • Large pot or deep fryer
  • Shot glass
  • Tongs
  • Wire Rack (optional)
  • Paper towel

Directions:


Prep everything before starting the cookies:
  • Allow the butter and 3 eggs to come to room temperature. Another trick I use is placing the eggs into warm water and microwaving the butter for a couple seconds.
  • Cover a clean surface with flour and have your rolling pin handy.
  • Into the large pot, scoop the vegetable shortening or pour enough canola oil, about 3-4 inches and heat it on high heat. If you are using a deep fryer, fill it with oil based on the manufacturer’s specifications.
  • Set up a wire rack with a paper towel underneath it to catch oil drippings or spread a paper towel down on a plate.  A wire rack is best so that the cookies remain crispy.

Preparing the dough:
  • Transfer the egg, 2 egg yolks, 1/8 teaspoon of butter, 1/4 teaspoon of salt, and 1/4 teaspoon of almond extract into a large mixing bowl.
  • With a mixer, beat the eggs with a whisk attachment until thick and the shade of yellow similar to a lemon.
  • Slowly beat in half a shot of alcohol of your choice and 1/4 cup of powered sugar.

  • With either your hands or the dough hook attachment of the mixer, mix in a cup of flour for 3-5 minutes until the dough is thick.
  • Set aside a tiny piece of the dough to later test the oil temperature.  Roll the rest of the dough into a ball.
  • Transfer the dough onto the floured surface.
  • With a rolling pin, roll out the dough very thin, about 1/8 of an inch.
  • With a sharp knife, cut the rolled out dough horizontally into 2 inch strips.
  • Then, cut those strips diagonally about 4 inches long.
  • Cut a small slit in the center of each piece of dough.
  • Gently, pull one end of the dough through the slit and continue to carefully pull it from the bottom so that it resembles a bow.


Frying the dough:

  • Before frying the dough, test the oil temperature by placing the tiny piece of dough that was set aside.  If the dough rises to the top and bubbles, then the oil is ready.

  • Place 6-8 pieces of dough into the oil one time and fry for 30 seconds.  Using your tongs, flip the dough onto the other side and fry for an additional 30 seconds or until the dough turns a light golden color.  These cookies are the best when they have a light crunch on the outside and are slightly chewy on the inside.
  • Drain the cookies on either a wire rack or paper towel and immediately sprinkle them with powdered sugar by hand or with a sifter.

  • Transfer the cookies onto a plate or store them into an air tight container for about a week.
Drizzle cookies with chocolate (optional):
  • Heat up half a cup of chocolate chips in the microwave for 30 seconds and stir the chocolate until all the chocolate chips are melted. 
  • Take a spoon and drizzle the chocolate over the cookies.